Quantcast
Channel: FLEXquarters.com Limited
Viewing all 313 articles
Browse latest View live

Troubleshooting - How to record the issue I am facing and show/sh...

$
0
0

Troubleshooting - How to record the issue I am facing and show/share the screen.

Problem Description:

How to record the issue I am facing and show/share the screen.

Solutions:

Please follow below steps for recording the issue you are facing.

1) Download screen recorder "TinyTake"

Clink Here to Download TinyTake.

Download software & install it.

2) Run TinyTake from the start menu.


3) Click on Capture Video.


3) Select region you want to show & click on Start Recording.


4) Click on stop to finish recording. You can click on pause to pause recording.


4) Click on save icon to save video locally. Click on YouTube icon to upload a video on YouTube.


4) Upload video on YouTube.

Click on YouTube icon to upload a video on YouTube.


You will see login screen to YouTube.


Please login to YouTube & grant permission to TinyTake.


Select Unlisted & click on Start Upload.


The video is uploading.


5) Copy YouTube video link by clicking on link icon & share with us in a support ticket.


Troubleshooting - How to Identify if application is 32-bit or 64-...

$
0
0

Troubleshooting - How to Identify if application is 32-bit or 64-bit

Problem Description:

How can I Identify if the application is 32-bit or 64-bit?

Solutions:


SQL Server

If your application is SQL Server, then you can identify it by Starting your "SQL Server Management Studio"

Login to your SQL Server.

On the Left-hand side panel, you will find the Server, Right Click on the "SQL Server" and Select Properties.


If SQL Server is 32 Bit you will notice 32-bit or x86 in product info.


If SQL Server is 32 Bit you will notice 64-bit in product info.


MS Office

If your application is MS Access or MS Excel, then you can identify it by from Help menu in MS Access/MS Excel


Using DSN list window

You can verify application from DSN list window also.

If your application showing below QODBC DSN at a time of connection, then your application is of 32 bit.

QuickBooks Data, QuickBooks Data QRemote

If your application showing below QODBC POS DSN at a time of connection, then your application is of 32 bit.

QuickBooks POS Data, QuickBooks POS Data QRemote

If your application showing below QODBC Online DSN at a time of connection, then your application is of 32 bit.

QuickBooks Online Data, QuickBooks Online Data QRemote


If your application showing below QODBC DSN at a time of connection, then your application is of 64 bit.

QuickBooks Data 64-Bit QRemote

If your application showing below QODBC POS DSN at a time of connection, then your application is of 32 bit.

QuickBooks POS Data 64-Bit

If your application showing below QODBC Online DSN at a time of connection, then your application is of 32 bit.

QuickBooks Online Data 64-Bit


Using Task Manager

You can verify application from Task Manager window also.

If the application is of 32 bit, then you will notice *32 after EXE name in process tab. If you can't see *32 after EXE name that means the application is of 64 bit.


Troubleshooting - How to locate data found in QuickBooks by table...

$
0
0

Troubleshooting - How to locate data found in QuickBooks by table and field name inside QODBC

Problem Description:

I have a question about How to locate data found in QuickBooks by table and field name inside the QODBC system.

Solutions:

The fastest way to find data in QuickBooks via the QODBC Driver is to use the bait and sync method. Inside QuickBooks, place a unique “bait” value in the field in question such as $findme$ for text fields or 123321 for numeric fields and save the data. Then start VB Demo connected to this QuickBooks file Refer Connecting QODBC Driver to QuickBooks for the First Time (Video), then do a global search for the “bait” value, the file and field name will be shown if the data is available via QODBC.

Please follow below steps to locate data found in QuickBooks by table and field name inside the QODBC system.

1) Add a sample $findme$ on Invoice or bill records (i.e. RefNumber).

For Example, We are creating Invoice with RefNumber (i.e. Invoice#) "$findme$".


2) Add a sample 123321 in CreditMemo rate.

For Example, We are creating CreditMemo with Rate "123321".


3) Use SP_GLOBALSEARCH command to search data from QuickBooks company file. (Requires v16.0.0.317 or above)

sp_globalsearch SearchValue

For Example:

sp_globalsearch $findme$


sp_globalsearch '123321'


Or

4) You can export QuickBooks Data to MS Excel using QODBC.

Please refer below mentioned article for exporting QuickBooks Data using QODBC:

How to Use QODBC with MS Excel


5) After exporting QuickBooks Data in excel sheet search data from excel sheet.

Find "$findme$" in whole workbook & clink on Find Next.


You can see search result below.


Find "123321" in the whole workbook & clink on Find Next.


You can see search result below.


Troubleshooting - How to give refund to existing CreditMemo using...

$
0
0

Troubleshooting - How to give refund to existing CreditMemo using QODBC

Problem Description:

How can I apply a refund check to an existing credit memo using QODBC?

In QuickBooks, I can refund by opening the Create Credit Memos/Refunds dialogue box using the QuickBooks UI and find the credit memo for that customer. In the dialogue box icon bar, click on the "Use credit to give a refund".


Solutions:

You can use CheckApplyCheckToTxn table which is Insert Only table to create a check to pay off a credit memo. You can give refunds to an existing credit memo by using below queries:

INSERT INTO CheckExpenseLine (AccountRefListID,ExpenseLineAccountRefListID,ExpenseLineAmount, ExpenseLineMemo,ExpenseLineCustomerRefListID, ExpenseLineBillableStatus, FQSaveToCache) Values ('20000-933270541','40000-933270541',80,'Test Memo','800000E2-1513333899',null,1)


Insert into CheckApplyCheckToTxn ( AccountRefListID,PayeeEntityRefListID,TxnDate,ApplyCheckToTxnTxnID,ApplyCheckToTxnAmount) values ('20000-933270541','800000E2-1513333899',{d'2017-12-18'},'1B3C0-1513338090',80)


After executing above queries, you can see CreditMemo as Refunded in QuickBooks.


You can get ApplyCheckToTxnTxnID from TxnID field of CreditMemo table for that particular Transaction by using below query.

SELECT TxnID,RefNumber FROM CreditMemo where RefNumber='1268'


Configure QODBC Online for use with Jitterbit Community Edition 3...

$
0
0

Configure QODBC Online for use with Jitterbit Community Edition 3.0.0 (QRemote)

To use QODBC Online with Jitterbit community edition 3.0.0, you should follow the steps below to configure your QODBC Online driver and Jitterbit connection. These steps work for QODBC with Jitterbit 3.0.0 on 32 bit Windows 7. Other platforms have not been tested.

First, you need to configure QRemote. To configure QRemote please follow below steps:

QRemote has two components “QRemote Client Driver for QODBC Online” and “QRemote Server for QODBC Online” 

QRemote Client Driver: Allows 64 Bit Applications to connect to QRemote Server and sends the Request to QRemote Server for Processing.  

QRemote Server: Processes requested instruction from QRemote Client to QuickBooks using QODBC Online DSN Driver. 


Start “QRemote Server for QODBC Online” from the start menu. ( If QRemoteServer is not running ) 


Double click the QRemote Server icon from the system tray

QRemote Server Main screen, shows the IP address and Port it allows the QRemote Client to connect to.

Make a note of IP address and Port number listed on the QRemote Server “Event Logs window”

Create a new DSN entry/or configure the existing one

Navigate to Start Menu, QODBC Drivers for Use with QuickBooks Online and click

Configure QODBC Online Data Source

QODBCStartMenu.png

"QuickBooks Online Data QRemote" is the default DSN created when installing QODBC.


Configure the DSN and provide the IP address and Port as listed under “QRemote Server”

Under the QRemote for QuickBooks Online– Client  DSN configuration screen, Please fill in the following information 

  • Data Source Name: Name of your DSN entry 
  • Server: IP address displayed on QRemote Server 
  • Port: Port displayed on QRemote Server 
  • Encryption Key :   

    (Keep Encryption Key empty/blank. In case you want to use encrypted data transfer between QRemote client and QRemoteServer, You can configure your encryption key on QRemoteServer and use the same on QRemote Client DSN) 

  • Remote DSN: select the QODBC Online DSN from the list. ( Make sure QRemote Server is running) 

After configuring QODBC, you need to configure Jitterbit. To configure Jitterbit please follow below steps:

1. Start the Jitterbit client

2. Right-click Sources and create a New Source

http://support.flexquarters.com/esupport/newimages/Jitterbit/Step4.png


3. Type QBONLINE in the Name field

4. Select Database for the type

5. Click Options

6. Ensure the box marked “Construct connection string manually” has a tick in it

7. Enter DSN=QuickBooks Online Data QRemote into the field adjacent to the checkbox.

8. Click the Save icon.

http://support.flexquarters.com/esupport/newimages/Jitterbit/Step5.png

Configure QODBC POS for use with Jitterbit Community Edition 3.0....

$
0
0

Configure QODBC POS for use with Jitterbit Community Edition 3.0.0 (QRemote)

To use QODBC POS with Jitterbit community edition 3.0.0, you should follow the steps below to configure your QODBC POS driver and Jitterbit connection. These steps work for QODBC with Jitterbit 3.0.0 on 32 bit Windows 7. Other platforms have not been tested.

First, you need to configure QRemote. To configure QRemote please follow below steps:

QRemote has two components “QRemote Client Driver for QODBC POS” and “QRemote Server for QODBC POS” 

QRemote Client Driver: Allows 64 Bit Applications to connect to QRemote Server and sends the Request to QRemote Server for Processing.  

QRemote Server: Processes requested instruction from QRemote Client to QuickBooks using QODBC POS DSN Driver. 


Start “QRemote Server for QODBC POS” from the start menu. ( If QRemoteServer is not running ) 


Double click the QRemote Server icon from the system tray

QRemote Server Main screen, shows the IP address and Port it allows the QRemote Client to connect to.

Make a note of IP address and Port number listed on the QRemote Server “Event Logs window”

Create a new DSN entry/or configure the existing one

Navigate to Start Menu, QODBC Drivers for Use with QuickBooks POS and click

Configure QODBC POS Data Source

QODBCStartMenu.png

"QuickBooks POS Data QRemote" is the default DSN created when installing QODBC.


Configure the DSN and provide the IP address and Port as listed under “QRemote Server”

Under the QRemote for QuickBooks POS– Client  DSN configuration screen, Please fill in the following information 

  • Data Source Name: Name of your DSN entry 
  • Server: IP address displayed on QRemote Server 
  • Port: Port displayed on QRemote Server 
  • Encryption Key :   

    (Keep Encryption Key empty/blank. In-case you want to use encrypted data transfer between QRemote client and QRemoteServer, You can configure your encryption key on QRemoteServer and use the same on QRemote Client DSN) 

  • Remote DSN: select the QODBC POS DSN from the list. ( Make sure QRemote Server is running) 

After configuring QODBC you need to configure Jitterbit. To configure Jitterbit please follow below steps:

1. Start the Jitterbit client

2. Right-click Sources and create a New Source

http://support.flexquarters.com/esupport/newimages/Jitterbit/Step4.png


3. Type QBPOS in the Name field

4. Select Database for the type

5. Click Options

6. Ensure the box marked “Construct connection string manually” has a tick in it

7. Enter DSN=QuickBooks POS Data QRemote into the field adjacent to the check-box.

8. Click the Save icon.

http://support.flexquarters.com/esupport/newimages/Jitterbit/Step5.png

Configure QODBC for use with Jitterbit Community Edition 3.0.0 (Q...

$
0
0

Configure QODBC for use with Jitterbit Community Edition 3.0.0 (QRemote)

To use QODBC with Jitterbit community edition 3.0.0 you should follow the steps below to configure your QODBC driver and Jitterbit connection. These steps work for QODBC with Jitterbit 3.0.0 on 32 bit Windows 7. Other platforms have not been tested.

First, you need to configure QRemote. To configure QRemote please follow below steps:

QRemote has two components “QRemote Client Driver for QODBC ” and “QRemote Server for QODBC ” 

QRemote Client Driver: Allows 64 Bit Applications to connect to QRemote Server and sends the Request to QRemote Server for Processing.  

QRemote Server: Processes requested instruction from QRemote Client to QuickBooks using QODBC DSN Driver. 


Start “QRemote Server for QODBC” from the start menu. ( If QRemoteServer is not running ) 


Double click the QRemote Server icon from the system tray

QRemote Server Main screen, shows the IP address and Port it allows the QRemote Client to connect to.

Make a note of IP address and Port number listed on the QRemote Server “Event Logs window”

Create a new DSN entry/or configure the existing one

Navigate to Start Menu, QODBC Drivers for Use with QuickBooks and click

Configure QODBC Data Source

QODBCStartMenu.png

"QuickBooks Data QRemote" is the default DSN created when installing QODBC.


Configure the DSN and provide the IP address and Port as listed under “QRemote Server”

Under the QRemote for QuickBooks – Client  DSN configuration screen, Please fill in the following information 

  • Data Source Name: Name of your DSN entry 
  • Server: IP address displayed on QRemote Server 
  • Port: Port displayed on QRemote Server 
  • Encryption Key :   

    (Keep Encryption Key empty/blank. In-case you want to use encrypted data transfer between QRemote client and QRemoteServer, You can configure your encryption key on QRemoteServer and use the same on QRemote Client DSN) 

  • Remote DSN: select the QODBC DSN from the list. ( Make sure QRemote Server is running) 

After configuring QODBC you need to configure Jitterbit. To configure Jitterbit please follow below steps:

1. Start the Jitterbit client

2. Right-click Sources and create a New Source

http://support.flexquarters.com/esupport/newimages/Jitterbit/Step4.png


3. Type QB in the Name field

4. Select Database for the type

5. Click Options

6. Ensure the box marked “Construct connection string manually” has a tick in it

7. Enter DSN=QuickBooks Data QRemote into the field adjacent to the check-box.

8. Click the Save icon.

http://support.flexquarters.com/esupport/newimages/Jitterbit/Step5.png

How to use QODBC Online with Alpha Five

$
0
0

Setup in Alpha Five

Create a New Workspace

     Start Alpha Five and create a new workspace, it could be called Online.adb - it is a holder for the entire application.

     Click the Workspace & Tasks tab -> Click -> choose Create a new, empty Workspace -> click OK.

Data Source Setup

     First click on Data Source, choose New Active-Link Table... option.

Select Single/Multiple Active Link table as per your requirement.

Build connection string by clicking Build button.

Select connection type "ODBC", Data Source Name "QuickBooks Online Data", Vendor "ODBC"& click on Test Connection button.

Click Connect button to connect with QuickBooks Online.

Now We are connected, Click on Next to proceed to next step.

Select tables which you want & Click on Next to proceed to next step.

Active link creation is in process.

Active link is created.

Click on table to view data.


Troubleshooting - How to use QODBC Online with FileMaker

$
0
0

Troubleshooting - How to use QODBC Online with FileMaker

Problem Description:

I downloaded the trial version of your driver this morning and am really excited about the prospects. I’ve installed it and am able to get the fields and tables to appear in VB Demo, but I am not able to connect using Filemaker Pro.


Solutions:

Please follow below-mentioned steps for FileMaker connectivity using QODBC Online

1) Open FileMaker Pro & click on Browse button.

step2.png

2) Please select the ODBC data source.

 step3.png

3) Please select the ODBC data source "QuickBooks Online Data" & click on "continue" button.

step3.png

4) Please enter user name & password for ODBC data source. If you have not defined any user name & password, then just click on "OK" button.  

 step4.png

5) Select tables & columns which you want to use, then please click on "Insert into SQL Query" & "Execute" button.

step5.png


6) Save result & you can see results.


step6.png

step7.png


How to use QODBC Online with QlikView

$
0
0

How to use QODBC Online with QlikView

To use QlikView with QODBC Online,  please follow the below steps.

1. Open QlikView & Create new file.

2. Select Data Source. Click on Browse.

3. Please select MS excel file & click on Next.

4. Click on Next.

5. Save QlikView file & Click on Next.

6. Select chart type & Click on Next.

7. Define dimensions & list boxes & click on Next.

8. Add expression & Click Finish

9. Now please navigate to file & click on Edit script.

10. Please select ODBC database & enable "Force 32 Bit" option & click on Connect.

11. Select "QuickBooks Online Data" DSN & click on Test Connection.


We can see the connection made with QuickBooks Online through QuickBooks Online Data DSN.

12. Qlikview locks up when we click on "Select" button on Edit Script window. Please do not click on Select button. You can write SQL statement as per your requirement & click on "Reload" button to execute the script.

For Example
SQL select * from customer


13. Choose a field which you want a show from tables which is returned by SQL statements & click on OK.

You can see results. You can repeat the same process for other tables & fields.


Note: In-case the QlikView designer is hanging when using "Select * from TableName", Please try changing SQL Statement to include limited Fields e.g  "Select ListID, Name from Customer"

Using QuickBooks Online Data with VBA

$
0
0

Using QuickBooks Online Data with VBA


Creating a Form in Microsoft Access:

Note: Microsoft Access is a product with many uses, and will allow you to use your QuickBooks Online Data files in the same fashion as Access databases.

Open MS Access, you can find it via Windows Start->All Programs->Microsoft Office :

A default database file name Database1 appears in the box. You can edit this to a more relevant name, such as QB Link.accdb. Save the file as type "Microsoft Office Access Databases".

Download Sample

Then Click "Create" to create a blank database:


After  the new database is created, Create a New Form via "Form Design" link in Create Tab:


After  the new form is created, Insert a button in form:

Rename button as per your requirement (In this example button name is "Select Customer"):

Now go on button property window and set property for "On Click" event select "Event Procedure" from dropdown list then click on "..." button:

New window is open which contains VBA code (In this example it contains code button click event):

Now Insert module in the form by Right clicking on form:

Write code in module (In this example I am writing code for selection of customer name):

*Note : use "Quickbooks Online Data" instead of "Quickbooks Data"


Link newly created module with button click event:

Now click on "Select Customer" button, you will get Name of all customer:

By repeating above steps you can add functionality in your VBA code as per your requirement. In this example I have added functionality for Insert,Update & Delete of customer record:

By clicking on "Insert Customer" button, New customer is added with name "Testing VB":

By clicking on "Update Customer" button, Newly added customer name is updated with name "Updated Testing VB":

By clicking on "Delete Customer" button, Newly added customer is deleted:

Please refer below code which is use in this example:

Select Customer:

Public Sub exampleSelect()
Const adOpenStatic = 3
Const adLockOptimistic = 3
Dim oConnection
Dim oRecordset
Dim sMsg
Dim sConnectString
Dim sSQL

sConnectString = "DSN=Quickbooks Online Data;OLE DB Services=-2;"
sSQL = "SELECT Name FROM customer"
Set oConnection = CreateObject("ADODB.Connection")
Set oRecordset = CreateObject("ADODB.Recordset")

oConnection.Open sConnectString
oRecordset.Open sSQL, oConnection, adOpenStatic, adLockOptimistic
sMsg = "**********************" & Chr(100)
Do While (Not oRecordset.EOF)
sMsg = sMsg & oRecordset.Fields("Name") & Chr(100)
oRecordset.MoveNext
Loop
sMsg = sMsg & "**********************"
MsgBox sMsg

oRecordset.Close
Set oRecordset = Nothing
oConnection.Close
Set oConnection = Nothing
End Sub

Insert Customer:

Public Sub exampleInsert()
Const adOpenStatic = 3
Const adLockOptimistic = 3

Dim oConnection
Dim oRecordset
Dim sMsg
Dim sConnectString
Dim sSQL

sConnectString = "DSN=Quickbooks Online Data;OLE DB Services=-2;"
sSQL = "Insert into customer (Name) values ('Testing VB')"
Set oConnection = CreateObject("ADODB.Connection")
Set oRecordset = CreateObject("ADODB.Recordset")
oConnection.Open sConnectString
oConnection.Execute (sSQL)
sMsg = sMsg & "Record Added!!!"
MsgBox sMsg

Set oRecordset = Nothing
Set oConnection = Nothing
End Sub

Update Customer:

Public Sub exampleUpdate()
Const adOpenStatic = 3
Const adLockOptimistic = 3

Dim oConnection
Dim oRecordset
Dim sMsg
Dim sConnectString
Dim sSQL

sConnectString = "DSN=Quickbooks Online Data;OLE DB Services=-2;"
sSQL = "Update customer set Name='Updated Testing VB' where name='Testing VB'"
Set oConnection = CreateObject("ADODB.Connection")
Set oRecordset = CreateObject("ADODB.Recordset")
oConnection.Open sConnectString
oConnection.Execute (sSQL)

sMsg = sMsg & "Record Updated!!!"
MsgBox sMsg

Set oRecordset = Nothing
oConnection.Close
Set oConnection = Nothing
End Sub

Delete Customer:

Public Sub exampleDelete()
Const adOpenStatic = 3
Const adLockOptimistic = 3

Dim oConnection
Dim oRecordset
Dim sMsg
Dim sConnectString
Dim sSQL
sConnectString = "DSN=Quickbooks Online Data;OLE DB Services=-2;"
sSQL = "delete from customer where name='Updated Testing VB'"
Set oConnection = CreateObject("ADODB.Connection")
Set oRecordset = CreateObject("ADODB.Recordset")
oConnection.Open sConnectString
oConnection.Execute (sSQL)
sMsg = sMsg & "Record Deleted!!!"
MsgBox sMsg

Set oRecordset = Nothing
oConnection.Close
Set oConnection = Nothing
End Sub

Download Sample


Sample Code for VB.NET with QODBC Online

$
0
0

Sample Code for VB.NET with QODBC Online

Sample Code of VB.NET to Create DataSet

Note: The following code is the minimal code required to create a DataSet from the SQL statement and attaches the dataset to a DataGrid.

Dim cnQODBC As System.Data.Odbc.OdbcConnection
Dim daQODBC As System.Data.Odbc.OdbcDataAdapter
Dim dsQODBC As System.Data.DataSet

cnQODBC = New System.Data.Odbc.OdbcConnection("DSN=QuickBooks Online Data")
cnQODBC.Open()
daQODBC = New System.Data.Odbc.OdbcDataAdapter("SELECT ListID, FullName, CompanyName FROM Customer", cnQODBC)
dsQODBC = New System.Data.DataSet

daQODBC.Fill(dsQODBC)
dgDataGrid.DataSource = dsQODBC
dgDataGrid.DataBind() 'May or maynot be required depending on where you put this code.

Using QuickBooks Online Data with Excel 2013 32-bit

$
0
0

How to Use QODBC Online with Microsoft Excel 2013 32-Bit


Setup QODBC to use with MS Excel 2013

Note: QODBC allows you to quickly merge live QuickBooks Online data into the cells of your Microsoft Excel worksheets for quick calculations and graphs. The data will retain a live link to QuickBooks, and one click will update the data in the worksheet to the most current data in the linked QuickBooks table.

Before using MS Excel application, please make sure you have installed MS Office Component named "Microsoft Query". About MS Query, please refer to Microsoft Office with MS Query and QODBC for more.

Please start Microsoft Excel 2013, from Windows Start->All Programs->Microsoft Office 2013:

Create a blank workbook or can open an existing one, in this example we are creating a new workbook:

An Empty sheet would open and you shall be on "Home" tab:

Please select the "Data" tab and click "From Other Sources->From Microsoft Query"

It will take some time to get the DSN list:


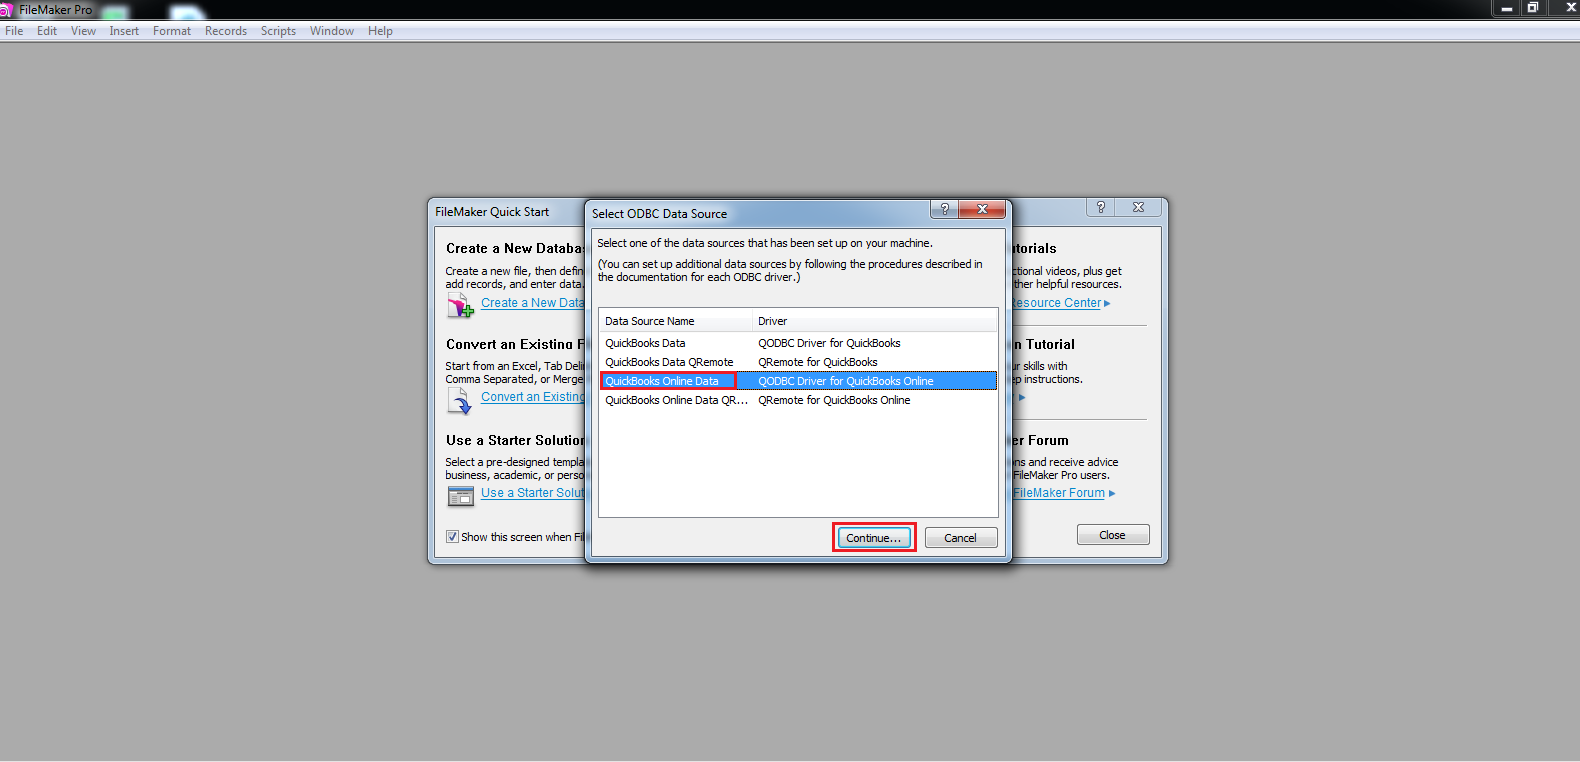
And then in the "Choose Data Source" Window, please select a DSN to continue. (Here I choose the default datasource with a sample company file opened. And check Use the Query Wizard to create/edit queries.).


Import QuickBooks data into MS Excel via MS Query

After you grant permission for QODBC, you will be guided by Query Wizard. In Choose Columns window, select a table and its columns you want to input. Multiple select is available. And once a table is selected, it is default that all its columns are selected. You can add or remove columns at the right list "Columns in your query"


You can set a filter for your query in this window, if you don't want to set any query, please click "Next" button:

This window allows you to sort your data, if you don't want change the order, please click "Next" button:

After the setup is finished, MS Excel will ask you to choose a edit method for the records:

Return Data to Microsoft Excel:

This method will directly export the data to Excel, you can view and edit these records, but the data is static, modification will not be uploaded into QuickBooks Online.

You can view the detailed connection properties by clicking "connection" button in Data menu:

In the WorkBook Connection Window, click "Properties" button to view detailed information:

Now you can view the connection string and its SQL statement in definition window:

View Data or Edit Query in MS Query :

This method will lead you to MS Query window and you can view and edit data via SQL Statement there, and all modification will be uploaded to QuickBooks.

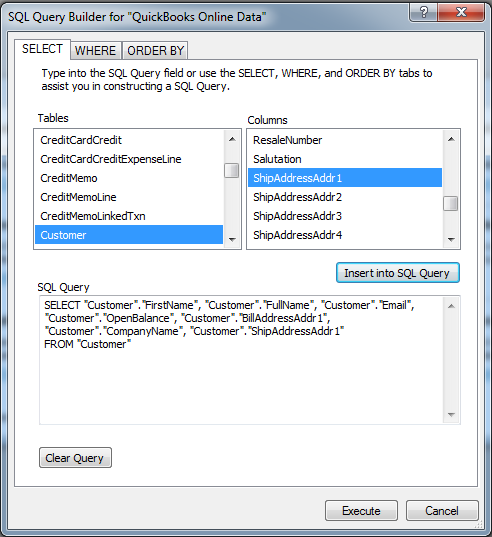
Click "SQL" button to view SQL Statement of this query. The SQL window will show the SQL Statement, and user can also modify the statement to extract other records:


The desired recordset is to contain only the records with a Name having a value equaling "Residential". Select the field header name and click on it, next select Criteria -> Add Criteria. In the poped out Add Criteria window,specify the criteria Field as "Name", Operator as "equals", then click Value button and from the list of values select "Residential" -> OK -> Add.


The following screen reflects the applied criteria to the query and the resulting QuickBooks recordset:


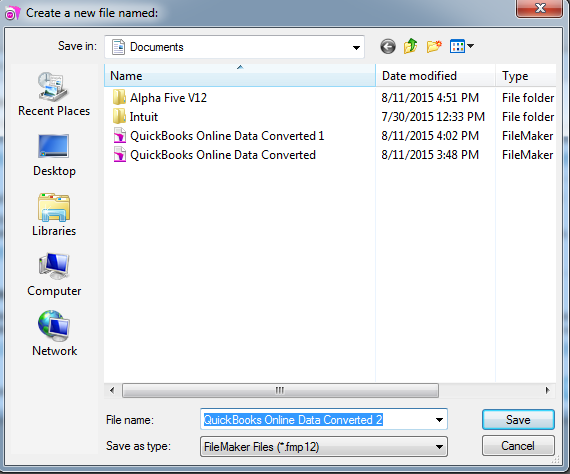
When you finish the query, choose to save it so that the next time you can directly use it. Leaving MS Query, MS Excel will ask you to import the query result into MS Excel:


     Clicking Data -> Refresh Data or click the  button in External Data toolbar will update the data in the worksheet from the latest information in the linked QuickBooks Online tables as shown above. Changes made to the QuickBooks Online files will not affect this worksheet until you refresh the data with the Refresh option.


Keywords : create odbc connection

Using QuickBooks Online Data with Access 2013 (Linked Tables) 32-...

$
0
0

How to Use QODBC Online with Microsoft Access 2013 to Build Linked Table


Creating a Table in Microsoft Access:

Note: Microsoft Access is a product with many uses, and will allow you to use your QuickBooks Online data files in the same fashion as Access databases.

Open MS Access 2013, you can find it via Windows Start->All Programs->Microsoft Office 2013:

A default database filename Database1 appears in the box. You can edit this to a more relevant name, such as QB Link.accdb. Save the file as type "Microsoft Office Access Databases".

Then Click "Create" to create a blank database:


After  the new database is created, Navigate to "External Data":

Build a connection via External Data->More->ODBC Database, or directly click ODBC database button at External Data menu:

Under Get External Data window, you will get two options:

Import the source data into a new table in the current database: this option will directly extract tables into Access DataBase, you can view and edit these tables but all modification will not be uploaded unless you build another query to do so.

Link to the data source by creating a linked table: this option will create a table just like the first option, but will keep its link to QuickBooks, which means all your operation to this table will be uploaded to QuickBooks, and the data in table is also in full sync with QuickBooks.

In this article, we will show you how to build linked table in MS Access.

Build a Linked Table in MS Access

After you select access method and click OK, then you will get a Select Data Source window:

Select the QuickBooks Online  Data DSN you setup with the QODBC driver. This can be one of our pre-installed DSN names or one that you have created. (Here I choose the default DSN as example.)


Once the connection is built, Access will return a list of available tables in Select Tables window. Please select tables you want to extract data from. Mutiple Selection is available.

If the Import/Linking works without any problems, you will see linked tables been created in the table list of MS Access:

If you want to view QuickBooks records in this linked table, just double click the linked server, then you will see the records:

FYI, linked table is always in sync with QuickBooks Online Data, so you cannot add or delete any columns in this table. But you can directly modify the data in linked table, QODBC will automatically update the modification to QuickBooks.

Note: In the case where you run across an application which is not fully ODBC compatible, often times they do support getting data from Access tables. To make this application work with QuickBooks Online tables, you can run the Microsoft Access setup as shown above. Then have this application use the MS Access ODBC driver to talk to the Access database, which you created, which was linked to QuickBooks Online tables. This middleware approach allows us to support nearly any application, even if not fully ODBC compliant.


Keywords : read/write with ms access

How to install QODBC Online & Using Excel, Access & VB Demo


How to Reconnect QODBC Online with QuickBooks Online Edition (App...

$
0
0

QODBC Online is no longer connected to QuickBooks Online.  Your user token is no longer valid.

How to connect / reconnect QODBC Online with QuickBooks Online Edition (Apps.com)

Please follow below mentioned steps to configure QODBC Online:

1) Open QODBC Online Setup Screen & click on "Connect To QuickBooks" & refer below steps by step guide:

Start>>All Programs>> QODBC Driver for use with QuickBooks Online>> Configure QODBC Online Data Source>> Go To "System DSN" Tab>> select QuickBooks Online Data>> click "configure">> switch to General tab


2) By clicking "Connect To QuickBooks" open authorization screen. You need to authorize your company file to work with QODBC Online.


3) You need to enable popup.


4) Enter your QuickBooks User ID & Password, then click on "Sign In"


5) Select company file which you want to use with QODBC Online. If you have multiple company file.


6) Click on "Authorize"


7) After successful authorization it will return back to QODBC Online page as connected status. You can close this window.


8) QODBC Online is successfully connected to your QuickBooks Online company.


9) Now we are testing connection through VB Demo application. Please open VB Demo from:

Start>>All Programs>> QODBC Driver for use with QuickBooks Online>> VB Demo:

Click on Connection "Add New Connection"


10) Select "QuickBooks Online Data" & click on "OK":


11) Now you can see we are connected to QuickBooks Online. Now we are querying Customer table:


Below are the list of Customers:


How to use QODBC Online with QuickBooks Online Edition (Apps.com)

$
0
0

How to use QODBC Online with QuickBooks Online Edition (Apps.com)

Setup of QODBC Online:

First we need to install QODBC Online. QODBC Online requires .Net Framework 4.0 or later version. So you need to install .Net Framework 4.0 to work with QODBC Online.
Please refer below steps to install QODBC Online:

1). Download QODBC Online installer from below link:

QODBC Driver for QuickBooks Online Download

2). Install QODBC Online:


Now we have installed QODBC Online.


Configure QODBC Online:

Now we need to authorize & configure QODBC Online to work with QuickBooks Online.

Please follow below steps configure QODBC Online:

1) Open QODBC Online Setup Screen & click on "Connect To QuickBooks" & refer below steps by step guide:

Start>>All Programs>> QODBC Driver for use with QuickBooks Online>> Configure QODBC Online Data Source>> Go To "System DSN" Tab>> select QuickBooks Online Data>> click "configure">> switch to General tab


2) By clicking "Connect To QuickBooks" open authorization screen. You need to authorize your company file to work with QODBC Online.


3) You need to enable popup.


4) Enter your QuickBooks User ID & Password, then click on "Sign In"


5) Select company file which you want to use with QODBC Online. If you have multiple company file.


6) Click on "Authorize"


7) After successful authorization it will return back to QODBC Online page as connected status. You can close this window.


8) QODBC Online is successfully connected to your QuickBooks Online company.


9) Now we are testing connection through VB Demo application. Please open VB Demo from:

Start>>All Programs>> QODBC Driver for use with QuickBooks Online>> VB Demo:

Click on Connection "Add New Connection"


10) Select "QuickBooks Online Data" & click on "OK":


11) Now you can see we are connected to QuickBooks Online. Now we are querying Customer table:


Below are the list of Customers:


Disconnect QODBC Online from your QuickBooks Online Company:

1) You can Disconnect from your QuickBooks Online company by clicking "Disconnect from QuickBooks" button.


2) By clicking on "Disconnect from QuickBooks" popup message appear for Disconnect connection to QuickBooks Online. Please click Yes to Disconnect.


3) QODBC Online is successfully Disconnected from your QuickBooks Online company.


Import / Export connection key:

If you want connect same company file from other machine, then you can export connection key from one machine & import it to other machine.

You can share connection key from:

Start>>All Programs>> QODBC Driver for use with QuickBooks Online>> Configure QODBC Online Data Source>> Go To "System DSN" Tab>> select QuickBooks Online Data>> click "configure">> switch to General tab >> click on "Export Connection key" button & share key.


Enter name of connection key & choose location where you want to save connection key:


Now connection key exported successfully. You can copy this connection key & paste it in other machine to import key on that machine.

You can import connection key from:

Start>>All Programs>> QODBC Driver for use with QuickBooks Online>> Configure QODBC Online Data Source>> Go To "System DSN" Tab>> select QuickBooks Online Data>> click "configure">> switch to General tab click on "Import Connection key" button & import key.


Open connection key from location where you keep connection key:


Now connection key imported successfully. You can connect to QuickBooks Online using this connection key.


Troubleshooting - QuickBooks Data DSN Not Showing Up In ODBCAD32....

$
0
0

Troubleshooting - QuickBooks Data DSN Not Showing Up In ODBCAD32.exe ODBC Data Source Administrator in Win8

Problem Description:

I can't configure QuickBooks Data DSN from Configure QODBC Data Source window. When I click on QuickBooks Data, configure is greyed out.


Please let me know what I am doing wrong.


Solutions:

You have opened 64 bit ODBC manager, On 64-bit platforms, 32-bit ODBC drivers are available to 32-bit applications, but not to 64-bit applications. What determines which ODBC driver architecture used is whether your application is 32-bit or 64-bit not whether your client platform (or database platform or DBMS) is 32-bit or 64-bit. Since QODBC is a 32-bit only ODBC driver, the only applications that can access it are 32-bit applications. So if you open ODBC Data Source window by default it will open 64 Bit ODBC Data Source Manager because OS is of 64 Bit.

You need to search "Configure QODBC Data Source"


Or

Run the 32 bit ODBC admin utility to see data source:

C:\windows\sysWOW64\odbcad32.exe


Open Configure QODBC Data Source>>Go To "System DSN" Tab>> select QuickBooks Data>> click "configure"

Start>> QODBC Driver for use with QuickBooks >> Configure QODBC Data Source >>Go To "System DSN" Tab >> select DSN name >> click "configure" >> General tab >> select mode when opening "Same as company file" option.


Troubleshooting - Application Connectivity Delay

$
0
0

Troubleshooting - Application Connectivity Delay

Problem Description:

I have an inventory control system (c#,SQL Server) that needs Read Only access to four tables in the accounting system. I have deployed your multiuser version and can get to the local QB instance from your VB app, Excel, and my app.

1. When I run your VB app in the production RDP session, the ODBC behavior is as expected.

2. I created a WPF/c# app to duplicate your VB and ran it in the production RDP session. The ODBC its behavior is expected.

3. When I run my app in my development environment, the ODBC behavior is as expected.

4. When I run my app in production RDP session, opening the ODBC connection takes > 6 minutes. But it opens.

Please let me know what I am doing wrong.


Solutions:

I would suggest you to please reset your Optimizer file,check connection time, log the connection time in your application. Please refer:

How to Remove Optimizer file

Please try below .net application for troubleshooting time delay in connection open and quering:

Sample code for Troubleshooting Connection Time Issue

If above does not resolve issue, please change the application, as it could be eating more resource in the environment.

Also please try to move the process of reading the QuickBooks tables to a background task. It will solve problem. I suspect that your app is consuming most of the thread pool. Creating an explicit task provided the process with sufficient resources will resolve the issue.  

Troubleshooting - Getting QODBC Not Supported error while Inserti...

$
0
0

Troubleshooting - Getting QODBC Not Supported error while Inserting Invoice

Problem Description:

I am trying to insert Invoice, But I am getting below error:

[QODBC] Not supported (#10003)

I am using below SQL statements:

INSERT INTO "InvoiceLine" ("InvoiceLineItemRefListID", "InvoiceLineDesc", "InvoiceLineRate", "InvoiceLineAmount", "InvoiceLineSalesTaxCodeRefListID", "FQSaveToCache") VALUES ('250000-933272656', 'Building permit 3', 3.00000, 3.00, '', 1)

INSERT INTO "Invoice" ("CustomerRefListID", "ARAccountRefListID", "TxnDate", "RefNumber", "BillAddressAddr1", "BillAddressAddr2", "BillAddressCity", "BillAddressState", "BillAddressPostalCode", "BillAddressCountry", "IsPending", "TermsRefListID", "DueDate", "ShipDate", "ItemSalesTaxRefListID", "Memo", "IsToBePrinted", "CustomerSalesTaxCodeRefListID") VALUES ('470001-1071525403', '40000-933270541', {d'2002-10-01'}, '1', 'Brad Lamb', '1921 Appleseed Lane', 'Bayshore', 'CA', '94326', 'USA', 0, '10000-933272658', {d'2002-10-31'}, {d'2002-10-01'}, '2E0000-933272656', 'Memo Test', 0, '10000-999022286')

I am getting below error:

http://support.flexquarters.com/esupport/newimages/NotSupported/step1.png


Please let me know what I am doing wrong.


Solutions:

You need to either provide value for SalesTaxCodeRefListID or remove it or pass null as value instead of empty string from insert statement

Your insert statement should be as below:

INSERT INTO "InvoiceLine" ("InvoiceLineItemRefListID", "InvoiceLineDesc", "InvoiceLineRate", "InvoiceLineAmount", "InvoiceLineSalesTaxCodeRefListID", "FQSaveToCache") VALUES ('250000-933272656', 'Building permit 3', 3.00000, 3.00, null, 1)

INSERT INTO "Invoice" ("CustomerRefListID", "ARAccountRefListID", "TxnDate", "RefNumber", "BillAddressAddr1", "BillAddressAddr2", "BillAddressCity", "BillAddressState", "BillAddressPostalCode", "BillAddressCountry", "IsPending", "TermsRefListID", "DueDate", "ShipDate", "ItemSalesTaxRefListID", "Memo", "IsToBePrinted", "CustomerSalesTaxCodeRefListID") VALUES ('470001-1071525403', '40000-933270541', {d'2002-10-01'}, '1', 'Brad Lamb', '1921 Appleseed Lane', 'Bayshore', 'CA', '94326', 'USA', 0, '10000-933272658', {d'2002-10-31'}, {d'2002-10-01'}, '2E0000-933272656', 'Memo Test', 0, '10000-999022286')

Viewing all 313 articles
Browse latest View live