Quantcast
Channel: FLEXquarters.com Limited
Viewing all 313 articles
Browse latest View live

How to Use QODBC with MS Excel PowerPivot

$
0
0

Setup QODBC to work with Microsoft Excel PowerPivot

Note: QODBC allows you to quickly merge live QuickBooks data into the cells of your Microsoft Excel worksheets for quick calculations and graphs. The data will retain a live link to QuickBooks, and one click will update the data in the worksheet to the most current data in the linked QuickBooks table.

Before using MS Excel PowerPivot application, please make sure you have installed MS Excel Add-in named "PowerPivot".

Please select PowerPivot Window.

Please select the data input method via From Other Sources->.

And then in the "Connect to a Data Source" Window, please select Others(OLEDB/ODBC).


After  click next, Please specify the connection string by clicking "Build" button:

Select DSN "QuickBooks Data" from the DSN list.

Now you will get Connection String build automatically.

Please click Next button

The first time use of MS Excel to access QuickBooks, you will be asked to grant access permission for this application:

Select "Yes, Always" option, and then click "Done" in the next window:

Choose How to Import The Data.(Choose second option "Write a query that will specify the data to import")

Write a SQL Statement that will specify the data to import.

Return Data to Microsoft Office Excel PowerPivot will directly export the data to PowerPivot, you can view and edit these records, but modification will not be uploaded.


Also Refer :
How to Use QODBC POS with Microsoft Access 2007
Using QuickBooks POS Data with Access 2010 (Import Tables) 32-bit
Using QuickBooks POS Data with Access 2010(Linked Tables) 32-bit
How to Configure QODBC to Work With 64-bit MS Access
Microsoft Access 2003 and QODBC


How to Insert Opening Balance in Customer Table using QODBC

$
0
0

How to Insert Opening Balance in Customer Table using QODBC

Problem Description

Initially I received the error "[QODBC] Field not allowed in insert" when I tried to insert data in the Customer table through QODBC. I was trying to insert customer data (Name,AccountNumber.....,Balance,CreditLimit). But QODBC is not allowed me to insert data. When I attempt to insert received below error:


Solutions

     Use "OpenBalance" field instead of "Balance" field, As QuickBooks SDK does not allows to insert value in "Balance" field but uses "OpenBalance". After inserting value in "OpenBalance" field, the value is moved to "Balance" field.

     Sample Query:

Insert into Customer
(AccountNumber,Name,BillAddressAddr1,BillAddressAddr2,BillAddressCity,BillAddressState,BillAddressPostalCode,BillAddressCountry,Phone,Fax,Email,Contact,Notes,SalesRepRefFullName,CustomerTypeRefFullName,TermsRefFullName,CreditLimit,OpenBalance,IsActive)
Values ('ABC-111', 'XYZ', 'DEF St. ', '', 'Minneapolis', 'MN', '55401', '', '999 999-9999', '', 'temp@xyz.com', 'XYZ', 'great guy', 'XYZ', '', 'COD', 0, 0, 1) 

     Note: Sample query contains dummy data Ref field are subjected to change as per your company file. You can add/remove fields from query as per your requirements.

How to Get Updated Custom Field with MS-Access (Linked Table)

$
0
0

How to Get Updated Custom Field with MS-Access (Linked Table)

In QuickBooks

      New Custom Fields are created within QuickBooks.

In MS Access

      Newly created Custom Fields are not visible.

      Solution to this issue is to re-create the linked table.

      Open MS Access Linked Table:

     Right Click on the On Your Linked Table(In This Example We are Using Customer Table):

     Now Click on the Delete.

Now Link the Same Table (In this example its Customer Table).  After Linking the table, you will get Updated Custom Field.

     Please refer below-mentioned link for How to Create Linked Table In MS Access:

How to Use QODBC with Microsoft Access 2007

How to Use QODBC with Microsoft Access 2010


Problem Description:

I am trying to use QODBC to read a vendor custom field named "Territory". From vbdemo, running "sp_columns vendor" produces a list of column data, but my custom fields don't appear to be there?

I have already reset the server and connection between QODBC & QuickBooks. But still I am unable to get Custom Field.


Solution:

Normally, You can get Custom Field using QODBC by reset connection between QODBC & QuickBooks. Custom Field will display in QODBC after Disconnect all the connections and connect again.

If you are still not getting Custom Field even after All  the connection between QODBC & QuickBooks are disconnected, Restarted Machine. So you need to reset Custom Fields from QuickBooks UI.

You need to remove the names of each custom field and unchecking where used, then reapplied the information and test again.

How to use QODBC Excel template

$
0
0

How to use QODBC Excel template


You can download the QODBC Excel Template, which has a majority of the tables and reports preconfigured..

All you have to do is download the Excel Template and copy the file to Default Template folder

To download the QODBC Default Template, Please click here

After download, Please Copy/Install it to Excel's default template folder
You can copy any Excel workbook into the Templates folder, then you can use the workbook as a template without saving it in the template file format (.xltx or .xltm). In Windows Vista, the Templates folder is usually C:\Users\<your name>\AppData\Roaming\Microsoft\Templates. In Microsoft Windows XP, the Templates folder is usually C:\Documents and Settings\<your name>\Application Data\Microsoft\Templates.

Please Refer Below links for detail

Customizing Excel defaults with templates - Excel - Office.com

or

Where do I find templates? - Excel - Office.com - Microsoft


When you start Excel, Please select "My Templates"

Select the "QODBC Default Template" and click.

A new Excel workbook will be created and will automatically fetch majority of the tables and report.

Please feel free to modify the workbook/queries/reports.


Also refer

How to Use QODBC with MS Excel 2007

How to Use QODBC with MS Excel 2010

How to Configure QODBC to Work With 64-bit MS Excel

Accessing QuickBooks data with QODBC Driver using MS Excel 2010 & MS Access 2010 (Video)

How to create Link Server with MS SQL 2005/2008/2012 32-Bit Using...

$
0
0

How to create Link Server with MS SQL 2005/2008/2012 32-Bit Using QODBC/QRemote

 For 64 Bit Refer: How to create Link Server with MS SQL 2005/2008/2012 64-Bit Using QODBC/QRemote

Start your "SQL Server Management Studio"

Login to your SQL Server.

On the Left-hand side panel, you will find the Server, Right Click on the "SQL Server" and Select Properties.


Please Verify that your SQL Server is of 32 Bit.


64 and 32-bit worlds are kept totally separate in the Microsoft Windows Operating System. QuickBooks is a 32-bit application, so in order to communicate with it, a 32 bit ODBC driver is required.


QRemote works as a bridge between 64Bit Applications and the 32 Bit QODBC Driver by communicating data calls between the two worlds using TCP/IP protocol.  QRemote makes it possible for 64 bit Web Servers and 64 Bit applications to talk to QuickBooks live for the first time via the QODBC Driver.

Since a 64bit application cannot talk to a 32-bit driver, we have to do a bit of magic to get the worlds to connect, we call it QRemote.

QRemote also works for 32-bit application as an alternative to DCom.  As SQL Server is a service based application it has to either use DCom or QRemote.

QRemote has two components “QRemote Client Driver for QODBC” and “QRemote Server for QODBC” 

QRemote Client Driver: Allows 64 Bit Applications to connect to QRemote Server and sends the Request to QRemote Server for Processing.  

QRemote Server: Processes requested instruction from QRemote Client to QuickBooks using QODBC DSN Driver. 


Start “QRemote Server for QODBC” from the start menu. ( If QRemoteServer is not running ) 


Double click the QRemote Server icon from the system tray


QRemote Server Main screen shows the IP address and Port it allows the QRemote Client to connect to.

Make a note of IP address and Port number listed on the QRemote Server “Event Logs window”


Create a new DSN entry/or configure the existing one

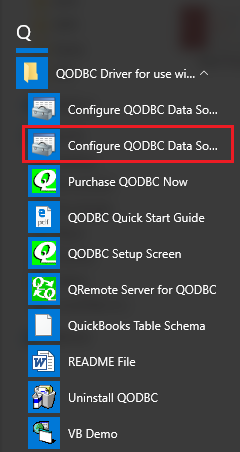
Navigate to Start Menu, QODBC Drivers for Use with QuickBooks and click

Configure QODBC Data Source


QODBCStartMenu.png

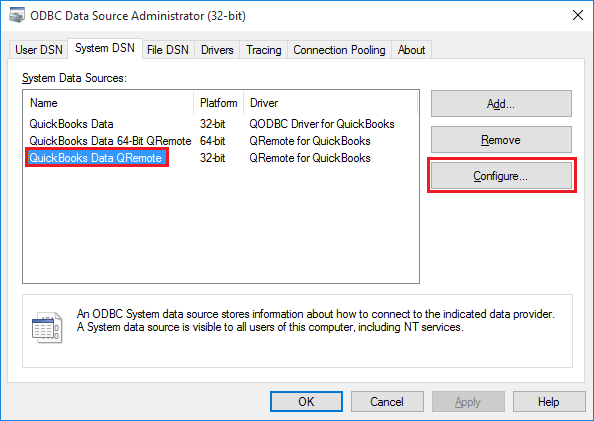
"QuickBooks Data QRemote" is the default DSN created when installing QODBC. (Earlier it was
“QRemote Data 32-bit”)


Configure the DSN and provide the IP address and Port as listed under “QRemote Server”


Under the QRemote for QuickBooks – Client  DSN configuration screen, Please fill in the following information 

  • Data Source Name: Name of your DSN entry 
  • Server: IP address displayed on QRemote Server 
  • Port: Port displayed on QRemote Server 
  • Encryption Key:   

    (Keep Encryption Key empty/blank. In-case you want to use encrypted data transfer between QRemote client and QRemoteServer, You can configure your encryption key on QRemoteServer and use the same on QRemote Client DSN) 

  • Remote DSN: select the QODBC DSN from the list. ( Make sure QRemote Server is running) 


Start Your QuickBooks.


Run MS SQL 2005 Dev / 2008 / 2012 (32-Bit) and Login in

    Run SQL Server Management Studio, you'd better choose the SQL Server Authentication and then input right name password. 


Under SQL Server Management Studio , Navigate to “Server Objects” -> Linked Server  -> New Linked Server

 OR


Provide the “New Linked Server” information


On Clicking OK, it will start establishing connection to QuickBooks,  Please accept the certificate for allowing data access on QuickBooks


After you have accepted the Certificate, the Linked server will be shown under “Linked Server” Category.


Configure MSDASQL (Microsoft OLE DB Provider for ODBC Drivers)


   The OLE DB provider options for managing linked queries can be set in SQL Server Management Studio. In Object Explorer, right-click the provider name and select Properties for MSDASQL.


Dynamic parameter should be checked to allow parameter queries. Level zero only should be checked to allow four part naming to work. Allow InProcess should be checked to help performance. Non transacted updates should be checked if you want to be able to update QuickBooks data. Index as access path should be checked to help performance. Disallow adhoc accesses should be unchecked to allow OPENQUERY to function.


QODBC/QRemote is ready to use with SQL Server/Linked Server

Execute below query

Select * from qremote…company


On each query, QRemote Server Logs the events, If you are facing any issues or delay in response, please refer QRemote Server Event Logs for details on which stage its taking more time.


Another Test

Select * from qremote…account

On each query, QRemote Server Logs the events, If you are facing any issues or delay in response, please refer QRemote Server Event Logs for details on which stage its taking more time.


Errors and Solutions


“[QODBC] QODBC  Server Edition License Required.”

The QODBC CD Key License you have activated is not of Server edition.  Please contact our Sales or Support team . http://support.flexquarters.com/esupport/


“[QODBC] Evaluation Expired”

You have run out of the 30-day trial/evaluation version, If you still wish to evaluate QODBC, Please contact our Sales team.

“QRemote” or “QODBC” contains multiple tables that match the table “TableName”

This means you have not configured “MSDASQL” provider. Please refer above steps and configure “MSDASQL” provider


Problem Description:

I have the read-only version included in the enterprise product. All I want to do is export data to SQL server. I can connect from the VB demo and from excel but not from SQL server (I always get cannot open Reckon Accounts).

I have made the SQL server process log on as the same windows user as ReckonAccounts and QODBC. I am not running RA or QODBC or SQL server as windows administrator and I have UAC turned on. Often during the query a box pops up trying to start:
c:\Program Files (x86)\intuit\Reckon Accounts 2015\DBManagerExe.exe StartServer 64


It pops up twice and I choose yes. I have also tried to manually run
c:\Program Files (x86)\intuit\Reckon Accounts 2015\DBManagerExe.exe StartServer 32.


Solution:

Please restart your machine & please run Reckon, login to your company file with Admin user & try to connect using your application.

To use DCOM Server & SQL Server with QODBC, you need a QODBC Server Edition license required.

Please use QRemote Server instead of DCOM Server to connect with SQL Server using QODBC. Please get in touch with your QODBC dealer for the purchasing QODBC Server Edition license.

For licensing detail please refer: QODBC with QRemote Licensing Information


Please Refer:

Using QuickBooks data with MS SQL Server using QODBC Driver and QRemote (Video)

QODBC Reports Architecture Mismatch Problem When connecting

Accessing QuickBooks Data Remotely using QODBC & QRemote. (Video)


Keywords: encryption

How to build QuickBooks IIS Web application using QODBC Driver an...

$
0
0


How to build QuickBooks IIS Web application using QODBC Driver and Microsoft ASP.NET (Video)


Accessing QuickBooks data with QODBC Driver using MS Excel 2010 &...

$
0
0

Accessing QuickBooks data with QODBC Driver using MS Excel 2010 & MS Access 2010

Sample Files  : 

Excel - Customer & Company Tables - Download

Excel - Majority of the Tables and Reports - Download

DCom Option / Server Edition Tab missing in QODBC Setup Tab

$
0
0


DCom / Server Edition tab missing in QODBC Setup Screen

We recommend you to use QRemote instead of DCom.  This is because QRemote is easy to configure and works for 32 & 64 Bit applications.

For SQL Server 64 Bit Click Here "How to create Link Server with MS SQL 2005/2008/2012 64-Bit Using QODBC/QRemote" ( Works for 32-Bit Too)

Below are the steps to Enable "DCom"  and "Server Edition" tab in QODBC Setup Screen.

Start QODBC Setup Screen

Navigate to "Advanced" Tab

Enable "Turn On Remote Connector And DCom"

Apply the changes

Click Ok


Re-Open QODBC Setup Screen

     When you go into the QODBC setup screen you should see a new tab "Server Edition" & "Remote Connector"


How to Rebuild an QuickBooks Company File

$
0
0

Solution:

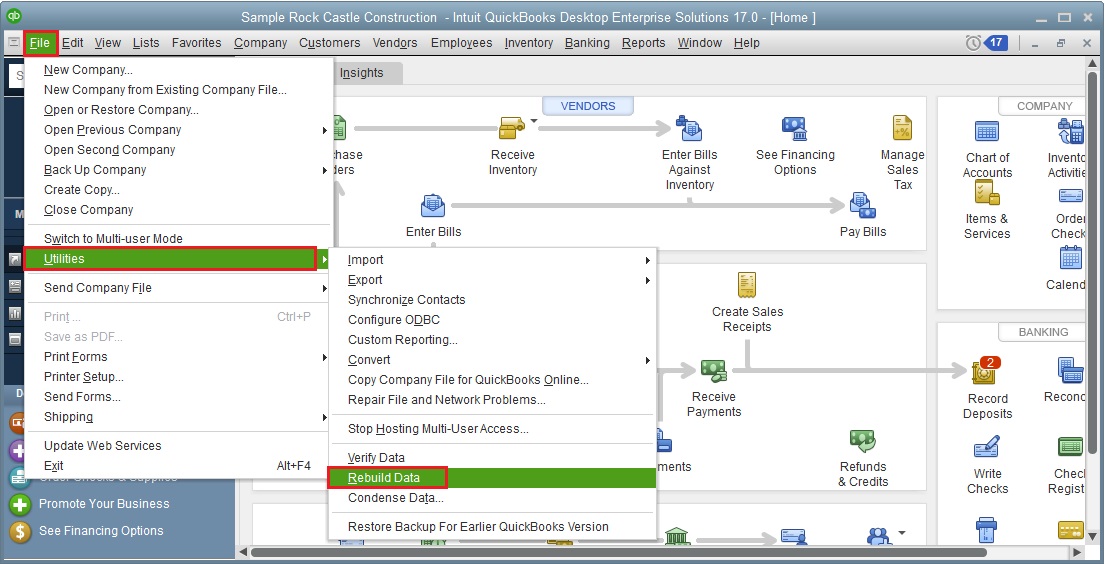
To rebuild your company file via File->Utilities->Rebuild Data in QuickBooks to see if it can fix your issue.

Rebuild Company file


How to Find Optimizer File/Where is Optimizer File Located

$
0
0

How to Find Optimizer File

Instructions

When optimizer is on, QODBC will automatically create an opt file to store the optimized data. When you reset QODBC optimizer, deleting the opt file is required. But we hare received some reports that opt files cannot be found. So we write this article to make a brief instruction on how to find Opt files..

1)Click Windows Start->Run

2)In the open option, input "%UserProfile%\QODBC Driver for QuickBooks\Optimizer". This is the default path for QODBC optimizer to store opt file.

OR

2)In the open option, input "%appdata%\QODBC Driver for QuickBooks\Optimizer". This is the default path for QODBC optimizer to store opt file.

3)In the folder, you will find the opt files named after your company file:

How to Install QODBC POS and Connect to QuickBooks POS on Windows...

$
0
0

How to Install QODBC POS and Connect to QuickBooks POS on Windows Vista/ Windows 7 Operating  System

Install QODBC POS

Please download QODBC Installer from this site:

http://www.qodbc.com/posDownload.htm

Then run it as administrator: (Right click on the Installer and select "Run As Administrator")


CD Key:

If you has purchased a license key, you can directly input your key to get QODBC POS full functional, but if this is the first time you install QODBC POS, you can leave this option blank to get a 30 days evaluation.

You can setup QODBC POS default DSN via Windows Start->All Programs->QODBC Driver for use with QuickBooks POS->QODBC POS Setup Screen. And if you found

And if you find "Evaluation Expired", "Unable to open license" or "Open license failed" description in About Window of QODBC POS Setup Screen:

Please run QODBC POS Setup Screen as administrator: ( Required Only Once )

If this is the first time you run QODBC POS and you have skip CD Key setp in installing, the About Window should be like this:

Connect to QuickBooks POS via QODBC POS

First, please open QuickBooks POS:

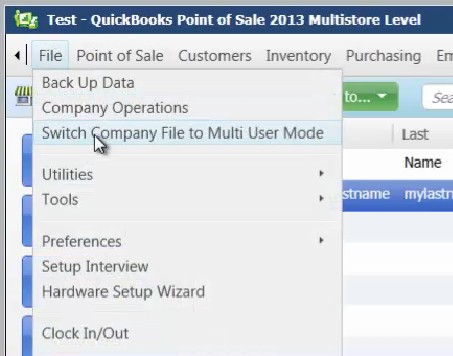
Please make sure you are on a single user mode, in File menu, there is a option "Switch Company File to Multi User Mode" which shows that you are under single mode:

And then open QODBC POS Setup Screen. Please leave "Current Company Setting" option blank so that QODBC POS could directly access the company file that is running in QuickBooks POS. And then click "Test Connection" button:

Then QuickBooks POS will ask you to grant permissions for QODBC POS:

Click "Yes Always" to continue, and QODBC POS will report conection successful if everything is ok:

And you can also use VB Demo to test the connection. You can simply find our test tools VB Demo via Windows Start->All Programs->QODBC Driver for use with QuickBooks POS->VB Demo:

In VB Demo window, click connection->Add new connection, in select Data Source window, select QuickBooks POS Data as your DSN:

Now you can access QuickBooks POS company file via VB Demo:

Run QODBC POS with QuickBooks POS Under Multi User Mode

Run QODBC POS with QuickBooks POS under multi user mode allows you to access and modify QuickBooks company file when other users logs in. And you can also build a connection string to assign a company file to the DSN so that you don't need to open QuickBooks POS when you use the DSN.

First, please switch QuickBooks POS to multi user mode, click "Switch Company File to Multi User Mode" option to turn QuickBooks POS to multi user mode:

Then open QODBC POS Setup Screen, Click "..." button at QODBC POS Setup Screen->General Window to enter company file selection window:

In company file selection window, QODBC POS will give you a list of all available company file (may takes a few seconds) :

Select the company file you want to access, and then click ok. then you will see the connection string has been built in "Current Company Setting" option. And then please click "Test Connection" Button:

QuickBooks POS will ask you to grant permission to QODBC POS again, click "Yes Always" button. If QODBC POS tells you the connection is successful, then you can use our test tools VB Demo to view QuickBooks POS records just the same as what you did in single user mode.

How to Add a New Line Item to an Existing Purchase Order

$
0
0

How to Add a New Line Item to an Existing Purchase Order

DESCRIPTION:We have already known how to create new PurchaseOderLine, Refer How to create a Purchase Order using QODBC for more details. After creating a new line item, we found that the system has automatically create a Purchase Order to contain the new line item. But what should be done if we just want to insert a new line item to an existing Purchase Order/Invoice? Here I will use an example to show how to add a line item to an existing Purchase Order.

Locate and Note Down the Purchase Order TxnID

QuickBooks generates a unique TxnID for each transaction that is added to QuickBooks. A TxnID can be used to refer to the transaction in our following requests.

Here we note this TxnID down:DCC-1071523566


Note:  VB DEMO is to be used for testing of QODBC SQL queries only and is not a development tool.


And this is the Purchase Order in QuickBooks:

Insert Line Item with the TxnID of Existing Purchase Order

Here is the query I use to insert line item:

INSERT INTO "PurchaseOrderLine"("TxnID",
"PurchaseOrderLineItemRefListID",
"PurchaseOrderLineDesc",
"PurchaseOrderLineQuantity",
"PurchaseOrderLineRate",
"PurchaseOrderLineAmount",
"FQSaveToCache")
VALUES ('DCC-1071523566', '240000-1071531214',
'Pen9', 1.0, 1.0, 1.11, 0)

Please note that the TxnID is the value we noted down in our 1st step.

And this is the result in QuickBooks:

[QODBC-Desktop] How to write Deposits using QODBC

$
0
0

Two Examples of Writing Deposits

Instructions

Note: Deposit inserts are done only to the DepositLine table. TheDeposit table is a header table and cannot be inserted into without cached DepositLines transactions.

TroubleShooting Note

     If you enconter the error as below:

     [QODBC] error : 3180 – There was an error when saving a deposit line. Quickbook error message : The Payment has been changed. (#10053).

     Switch your company file to Single User Mode. This is a "confirmed by Intuit" bug in QuickBooks 2004 through to 2006 and only occurs when you try to do a deposit with the company file in multi-user mode.

     Below are two examples.

DEPOSIT FROM RECEIVE PAYMENTS MADE TO UNDEPOSITED FUNDS

Locate the payment TxnID

      The first step is to locate the payment TxnID made to undeposited funds. To do this you run the following query in VB Demo:

      SELECT TxnID, CustomerRefFullName, RefNumber, Amount FROM ReceivePaymentToDeposit


Note: 
 VB DEMO is to be used for testing of QODBC SQL queries only and is not a development tool.


Confirm the Exact Name of the Bank Account

      The second step is toconfirm the exact name of the Bank Account you want to deposit the payment into. To do this you run the following query in VB Demo:

      SELECT ListID, Name FROM Account where Name = 'ABC Bank'

Receive Payment made to Undeposited Funds

     Now you're ready to receive the payment made to undeposited funds using the TxnID and Bank Account Name found above. To do this you run the following query in VB Demo:

     INSERT INTO DepositLine (DepositLinePaymentTxnID, DepositToAccountRefFullName,TxnDate,FQSaveToCache)
    Values ('EDB-1197676347','ABC Bank',{d'2007-12-15'},0)

     If you matched the details correctly you will receive the "Query Executed. No results returned" OK message!

DEPOSIT MADE DIRECTLY FROM THE DEPOSIT WINDOW

Query in QODBC

     INSERT INTO DepositLine (DepositLineAccountRefFullName,DepositLineAmount,DepositLineCheckNumber,
     DepositLineEntityRefFullName,DepositLineMemo,DepositLinePaymentMethodRefFullName,
     DepositToAccountRefFullName,Memo,TxnDate,FQSaveToCache)
     Values ('Interest Income',2000,'PANDA4567','2V:Panda Industries','Panda
     memo','Check','BankNorth','Deposit',{d'2005-02-17'},0)

Table Schema Rules for DepositLine

Note: Use the columns stored procedure in VB Demo to get the EXACT table schema rules for the QuickBooks Company file you have open. The last few columns have Queryable, Updateable, Insertable, Required_On_Insert ie:

     sp_columns DepositLine

FQSaveToCache

     Multi-line inserts require a series of SQL statements to complete a single deposit. The key to this process is the field named "FQSaveToCache". This field is not part of the table, but is used as a flag to the QODBC driver to cache the inserts until your ready to commit all the inserts. The value of "FQSaveToCache" is set to 1 or TRUE for the insert sql statements for the first lines in the deposit, and then it is set to 0 or FALSE for the final sql statement, the last line of your multi-line deposit.

     The 0 or False "FQSaveToCache" value tells QODBC to then write all the SQL inserts as multiple lines for the one deposit (header row record).


DEPOSIT CASH FROM AN EXTERNAL POS SYSTEM

Locate List IDs

     To deposit cash you need to locate the List IDs for your posting. For example:

     3C0000-1106175506 is GL Bank Account List ID
     3E0000-1130003331 is AR Account List ID

Insert Statement

     INSERT INTO "DepositLine" ("TxnDate", "DepositToAccountRefListID", "Memo", "DepositLineAccountRefListID", "DepositLineAmount") VALUES ({d'2005-10-27'}, '3C0000-1106175506', 'POS Cash Deposit', '3E0000-1130003331', 5.50)

Note: Never use DepositTotal, always use DepositLineAmount.

Keywords : accountlistid, accountname missing stored procedure, Recive

[QODBC-Online] Sample Code for VB.NET with QODBC Online

$
0
0

Sample Code for VB.NET with QODBC Online

Sample Code of VB.NET to Create DataSet

Note: The following code is the minimal code required to create a DataSet from the SQL statement and attaches the dataset to a DataGrid.

Dim cnQODBC As System.Data.Odbc.OdbcConnection
Dim daQODBC As System.Data.Odbc.OdbcDataAdapter
Dim dsQODBC As System.Data.DataSet

cnQODBC = New System.Data.Odbc.OdbcConnection("DSN=QuickBooks Online Data")
cnQODBC.Open()
daQODBC = New System.Data.Odbc.OdbcDataAdapter("SELECT ListID, FullName, CompanyName FROM Customer", cnQODBC)
dsQODBC = New System.Data.DataSet

daQODBC.Fill(dsQODBC)
dgDataGrid.DataSource = dsQODBC
dgDataGrid.DataBind() 'May or maynot be required depending on where you put this code.

[QODBC-Online] Using QuickBooks Online Data with Excel 2013 32-bi...

$
0
0

How to Use QODBC Online with Microsoft Excel 2013 32-Bit


Setup QODBC to use with MS Excel 2013

Note: QODBC allows you to quickly merge live QuickBooks Online data into the cells of your Microsoft Excel worksheets for quick calculations and graphs. The data will retain a live link to QuickBooks, and one click will update the data in the worksheet to the most current data in the linked QuickBooks table.

Before using MS Excel application, please make sure you have installed MS Office Component named "Microsoft Query". About MS Query, please refer to Microsoft Office with MS Query and QODBC for more.

Please start Microsoft Excel 2013, from Windows Start->All Programs->Microsoft Office 2013:

Create a blank workbook or can open an existing one, in this example we are creating a new workbook:

An Empty sheet would open and you shall be on "Home" tab:

Please select the "Data" tab and click "From Other Sources->From Microsoft Query"

It will take some time to get the DSN list:


And then in the "Choose Data Source" Window, please select a DSN to continue. (Here I choose the default datasource with a sample company file opened. And check Use the Query Wizard to create/edit queries.).


Import QuickBooks data into MS Excel via MS Query

After you grant permission for QODBC, you will be guided by Query Wizard. In Choose Columns window, select a table and its columns you want to input. Multiple select is available. And once a table is selected, it is default that all its columns are selected. You can add or remove columns at the right list "Columns in your query"


You can set a filter for your query in this window, if you don't want to set any query, please click "Next" button:

This window allows you to sort your data, if you don't want change the order, please click "Next" button:

After the setup is finished, MS Excel will ask you to choose a edit method for the records:

Return Data to Microsoft Excel:

This method will directly export the data to Excel, you can view and edit these records, but the data is static, modification will not be uploaded into QuickBooks Online.

You can view the detailed connection properties by clicking "connection" button in Data menu:

In the WorkBook Connection Window, click "Properties" button to view detailed information:

Now you can view the connection string and its SQL statement in definition window:

View Data or Edit Query in MS Query :

This method will lead you to MS Query window and you can view and edit data via SQL Statement there, and all modification will be uploaded to QuickBooks.

Click "SQL" button to view SQL Statement of this query. The SQL window will show the SQL Statement, and user can also modify the statement to extract other records:


The desired recordset is to contain only the records with a Name having a value equaling "Residential". Select the field header name and click on it, next select Criteria -> Add Criteria. In the poped out Add Criteria window,specify the criteria Field as "Name", Operator as "equals", then click Value button and from the list of values select "Residential" -> OK -> Add.


The following screen reflects the applied criteria to the query and the resulting QuickBooks recordset:


When you finish the query, choose to save it so that the next time you can directly use it. Leaving MS Query, MS Excel will ask you to import the query result into MS Excel:


     Clicking Data -> Refresh Data or click the  button in External Data toolbar will update the data in the worksheet from the latest information in the linked QuickBooks Online tables as shown above. Changes made to the QuickBooks Online files will not affect this worksheet until you refresh the data with the Refresh option.


Keywords : create odbc connection


[QODBC-Online] Using QuickBooks Online Data with VBA

$
0
0

Using QuickBooks Online Data with VBA


Creating a Form in Microsoft Access:

Note: Microsoft Access is a product with many uses, and will allow you to use your QuickBooks Online Data files in the same fashion as Access databases.

Open MS Access, you can find it via Windows Start->All Programs->Microsoft Office :

A default database file name Database1 appears in the box. You can edit this to a more relevant name, such as QB Link.accdb. Save the file as type "Microsoft Office Access Databases".

Download Sample

Then Click "Create" to create a blank database:


After  the new database is created, Create a New Form via "Form Design" link in Create Tab:


After  the new form is created, Insert a button in form:

Rename button as per your requirement (In this example button name is "Select Customer"):

Now go on button property window and set property for "On Click" event select "Event Procedure" from dropdown list then click on "..." button:

New window is open which contains VBA code (In this example it contains code button click event):

Now Insert module in the form by Right clicking on form:

Write code in module (In this example I am writing code for selection of customer name):

*Note : use "Quickbooks Online Data" instead of "Quickbooks Data"


Link newly created module with button click event:

Now click on "Select Customer" button, you will get Name of all customer:

By repeating above steps you can add functionality in your VBA code as per your requirement. In this example I have added functionality for Insert,Update & Delete of customer record:

By clicking on "Insert Customer" button, New customer is added with name "Testing VB":

By clicking on "Update Customer" button, Newly added customer name is updated with name "Updated Testing VB":

By clicking on "Delete Customer" button, Newly added customer is deleted:

Please refer below code which is use in this example:

Select Customer:

Public Sub exampleSelect()
Const adOpenStatic = 3
Const adLockOptimistic = 3
Dim oConnection
Dim oRecordset
Dim sMsg
Dim sConnectString
Dim sSQL

sConnectString = "DSN=Quickbooks Online Data;OLE DB Services=-2;"
sSQL = "SELECT Name FROM customer"
Set oConnection = CreateObject("ADODB.Connection")
Set oRecordset = CreateObject("ADODB.Recordset")

oConnection.Open sConnectString
oRecordset.Open sSQL, oConnection, adOpenStatic, adLockOptimistic
sMsg = "**********************" & Chr(100)
Do While (Not oRecordset.EOF)
sMsg = sMsg & oRecordset.Fields("Name") & Chr(100)
oRecordset.MoveNext
Loop
sMsg = sMsg & "**********************"
MsgBox sMsg

oRecordset.Close
Set oRecordset = Nothing
oConnection.Close
Set oConnection = Nothing
End Sub

Insert Customer:

Public Sub exampleInsert()
Const adOpenStatic = 3
Const adLockOptimistic = 3

Dim oConnection
Dim oRecordset
Dim sMsg
Dim sConnectString
Dim sSQL

sConnectString = "DSN=Quickbooks Online Data;OLE DB Services=-2;"
sSQL = "Insert into customer (Name) values ('Testing VB')"
Set oConnection = CreateObject("ADODB.Connection")
Set oRecordset = CreateObject("ADODB.Recordset")
oConnection.Open sConnectString
oConnection.Execute (sSQL)
sMsg = sMsg & "Record Added!!!"
MsgBox sMsg

Set oRecordset = Nothing
Set oConnection = Nothing
End Sub

Update Customer:

Public Sub exampleUpdate()
Const adOpenStatic = 3
Const adLockOptimistic = 3

Dim oConnection
Dim oRecordset
Dim sMsg
Dim sConnectString
Dim sSQL

sConnectString = "DSN=Quickbooks Online Data;OLE DB Services=-2;"
sSQL = "Update customer set Name='Updated Testing VB' where name='Testing VB'"
Set oConnection = CreateObject("ADODB.Connection")
Set oRecordset = CreateObject("ADODB.Recordset")
oConnection.Open sConnectString
oConnection.Execute (sSQL)

sMsg = sMsg & "Record Updated!!!"
MsgBox sMsg

Set oRecordset = Nothing
oConnection.Close
Set oConnection = Nothing
End Sub

Delete Customer:

Public Sub exampleDelete()
Const adOpenStatic = 3
Const adLockOptimistic = 3

Dim oConnection
Dim oRecordset
Dim sMsg
Dim sConnectString
Dim sSQL
sConnectString = "DSN=Quickbooks Online Data;OLE DB Services=-2;"
sSQL = "delete from customer where name='Updated Testing VB'"
Set oConnection = CreateObject("ADODB.Connection")
Set oRecordset = CreateObject("ADODB.Recordset")
oConnection.Open sConnectString
oConnection.Execute (sSQL)
sMsg = sMsg & "Record Deleted!!!"
MsgBox sMsg

Set oRecordset = Nothing
oConnection.Close
Set oConnection = Nothing
End Sub

Download Sample


[QODBC-Online] How to use QODBC Online with QlikView

$
0
0

How to use QODBC Online with QlikView

To use QlikView with QODBC Online,  please follow the below steps.

1. Open QlikView & Create new file.

2. Select Data Source. Click on Browse.

3. Please select MS excel file & click on Next.

4. Click on Next.

5. Save QlikView file & Click on Next.

6. Select chart type & Click on Next.

7. Define dimensions & list boxes & click on Next.

8. Add expression & Click Finish

9. Now please navigate to file & click on Edit script.

10. Please select ODBC database & enable "Force 32 Bit" option & click on Connect.

11. Select "QuickBooks Online Data" DSN & click on Test Connection.


We can see the connection made with QuickBooks Online through QuickBooks Online Data DSN.

12. Qlikview locks up when we click on "Select" button on Edit Script window. Please do not click on Select button. You can write SQL statement as per your requirement & click on "Reload" button to execute the script.

For Example
SQL select * from customer


13. Choose a field which you want a show from tables which is returned by SQL statements & click on OK.

You can see results. You can repeat the same process for other tables & fields.


Note: In-case the QlikView designer is hanging when using "Select * from TableName", Please try changing SQL Statement to include limited Fields e.g  "Select ListID, Name from Customer"

[QODBC-POS] Configure QODBC POS for use with Jitterbit Community ...

$
0
0

Configure QODBC POS for use with Jitterbit Community Edition 3.0.0 (QRemote)

To use QODBC POS with Jitterbit community edition 3.0.0, you should follow the steps below to configure your QODBC POS driver and Jitterbit connection. These steps work for QODBC with Jitterbit 3.0.0 on 32 bit Windows 7. Other platforms have not been tested.

First, you need to configure QRemote. To configure QRemote please follow below steps:

QRemote has two components “QRemote Client Driver for QODBC POS” and “QRemote Server for QODBC POS” 

QRemote Client Driver: Allows 64 Bit Applications to connect to QRemote Server and sends the Request to QRemote Server for Processing.  

QRemote Server: Processes requested instruction from QRemote Client to QuickBooks using QODBC POS DSN Driver. 


Start “QRemote Server for QODBC POS” from the start menu. ( If QRemoteServer is not running ) 


Double click the QRemote Server icon from the system tray

QRemote Server Main screen, shows the IP address and Port it allows the QRemote Client to connect to.

Make a note of IP address and Port number listed on the QRemote Server “Event Logs window”

Create a new DSN entry/or configure the existing one

Navigate to Start Menu, QODBC Drivers for Use with QuickBooks POS and click

Configure QODBC POS Data Source

QODBCStartMenu.png

"QuickBooks POS Data QRemote" is the default DSN created when installing QODBC.


Configure the DSN and provide the IP address and Port as listed under “QRemote Server”

Under the QRemote for QuickBooks POS– Client  DSN configuration screen, Please fill in the following information 

  • Data Source Name: Name of your DSN entry 
  • Server: IP address displayed on QRemote Server 
  • Port: Port displayed on QRemote Server 
  • Encryption Key :   

    (Keep Encryption Key empty/blank. In-case you want to use encrypted data transfer between QRemote client and QRemoteServer, You can configure your encryption key on QRemoteServer and use the same on QRemote Client DSN) 

  • Remote DSN: select the QODBC POS DSN from the list. ( Make sure QRemote Server is running) 

After configuring QODBC you need to configure Jitterbit. To configure Jitterbit please follow below steps:

1. Start the Jitterbit client

2. Right-click Sources and create a New Source

http://support.flexquarters.com/esupport/newimages/Jitterbit/Step4.png


3. Type QBPOS in the Name field

4. Select Database for the type

5. Click Options

6. Ensure the box marked “Construct connection string manually” has a tick in it

7. Enter DSN=QuickBooks POS Data QRemote into the field adjacent to the check-box.

8. Click the Save icon.

http://support.flexquarters.com/esupport/newimages/Jitterbit/Step5.png

[QODBC-Desktop] Configure QODBC for use with Jitterbit Community ...

$
0
0

Configure QODBC for use with Jitterbit Community Edition 3.0.0 (QRemote)

To use QODBC with Jitterbit community edition 3.0.0 you should follow the steps below to configure your QODBC driver and Jitterbit connection. These steps work for QODBC with Jitterbit 3.0.0 on 32 bit Windows 7. Other platforms have not been tested.

First, you need to configure QRemote. To configure QRemote please follow below steps:

QRemote has two components “QRemote Client Driver for QODBC ” and “QRemote Server for QODBC ” 

QRemote Client Driver: Allows 64 Bit Applications to connect to QRemote Server and sends the Request to QRemote Server for Processing.  

QRemote Server: Processes requested instruction from QRemote Client to QuickBooks using QODBC DSN Driver. 


Start “QRemote Server for QODBC” from the start menu. ( If QRemoteServer is not running ) 


Double click the QRemote Server icon from the system tray

QRemote Server Main screen, shows the IP address and Port it allows the QRemote Client to connect to.

Make a note of IP address and Port number listed on the QRemote Server “Event Logs window”

Create a new DSN entry/or configure the existing one

Navigate to Start Menu, QODBC Drivers for Use with QuickBooks and click

Configure QODBC Data Source

QODBCStartMenu.png

"QuickBooks Data QRemote" is the default DSN created when installing QODBC.


Configure the DSN and provide the IP address and Port as listed under “QRemote Server”

Under the QRemote for QuickBooks – Client  DSN configuration screen, Please fill in the following information 

  • Data Source Name: Name of your DSN entry 
  • Server: IP address displayed on QRemote Server 
  • Port: Port displayed on QRemote Server 
  • Encryption Key :   

    (Keep Encryption Key empty/blank. In-case you want to use encrypted data transfer between QRemote client and QRemoteServer, You can configure your encryption key on QRemoteServer and use the same on QRemote Client DSN) 

  • Remote DSN: select the QODBC DSN from the list. ( Make sure QRemote Server is running) 

After configuring QODBC you need to configure Jitterbit. To configure Jitterbit please follow below steps:

1. Start the Jitterbit client

2. Right-click Sources and create a New Source

http://support.flexquarters.com/esupport/newimages/Jitterbit/Step4.png


3. Type QB in the Name field

4. Select Database for the type

5. Click Options

6. Ensure the box marked “Construct connection string manually” has a tick in it

7. Enter DSN=QuickBooks Data QRemote into the field adjacent to the check-box.

8. Click the Save icon.

http://support.flexquarters.com/esupport/newimages/Jitterbit/Step5.png

[QODBC-Online] How to use QODBC Online with Alpha Five

$
0
0

Setup in Alpha Five

Create a New Workspace

     Start Alpha Five and create a new workspace, it could be called Online.adb - it is a holder for the entire application.

     Click the Workspace & Tasks tab -> Click -> choose Create a new, empty Workspace -> click OK.

Data Source Setup

     First click on Data Source, choose New Active-Link Table... option.

Select Single/Multiple Active Link table as per your requirement.

Build connection string by clicking Build button.

Select connection type "ODBC", Data Source Name "QuickBooks Online Data", Vendor "ODBC"& click on Test Connection button.

Click Connect button to connect with QuickBooks Online.

Now We are connected, Click on Next to proceed to next step.

Select tables which you want & Click on Next to proceed to next step.

Active link creation is in process.

Active link is created.

Click on table to view data.

Viewing all 313 articles
Browse latest View live