Connecting multiple QuickBooks companies via Excel
There is a limitation with the QuickBooks SDK that it can connect only 1 company file at a time a user session.
It means you cannot access multiple company files at the same time.
You need to close connection for one company file and switch to another company file. ( i.e connection close for company A and Connection open for company b, should have a gap of 15-30 seconds for switching operation.)
In this article, We will connect to two different company file using two different QODBC DSN which has auto login configured. We will be using two auto login DSN CompanyA & CompanyB in this example.
Please Refer:
How to setup QODBC for Auto-login into QuickBooks
How to setup QODBC Driver to auto-connect to QuickBooks. (Video)
Here is my DSN configuration for First Company file.


You need to open QuickBooks & load company file which you have chosen in auto login DSN. Company file path in QuickBooks & DSN should be matched.

Open MS Excel & create a new spreadsheet.
First, please select the "Data" tab, Navigate to "From Other Sources"->" From Microsoft Query"

And then in the "Choose Data Source" Window, please select a DSN to continue. (Here I choose the default data source with a sample company file opened. And check Use the Query Wizard to create/edit queries.)
'CompanyA' as an example:

The first time use MS Excel to access QuickBooks, you will be asked to grant access permission for QODBC. After you grant permission for QODBC, you will be guided by Query Wizard. Choose any table click on next until you reach to Query Wizard.
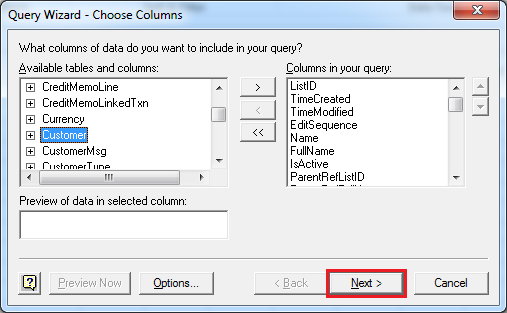
Select View data or edit query in Microsoft Query & click Finish:

Write query & click OK. In this example, I am writing Trial Balance report query.
sp_report TrialBalance show Debit_Title, Credit_Title, Label, Debit, Credit parameters DateMacro = 'LastMonth', ReportBasis = 'Cash'

You will get below message box about SQL Query, Click OK.

Report data is available in Microsoft Query:

Click on File & Return Data to Microsoft Excel to save the export report in Excel spreadsheet.

When you finish the query, choose to save it so that the next time you can directly use it. Leaving MS Query, MS Excel will ask you to import the query result into MS Excel:

Report Data is exported in Excel sheet1.

Now by repeating above steps we will export another report in sheet2 using DSN CompanyB.
We need to close first company file which is opened in QuickBooks.

Here is my DSN configuration for Second Company file.

You need to open QuickBooks & load company file which you have chosen in auto login DSN. Company file path in QuickBooks & DSN should be matched.

Navigate to sheet2
First, please select the "Data" tab, Navigate to "From Other Sources"->" From Microsoft Query"
And then in the "Choose Data Source" Window, please select a DSN to continue. (Here I choose the default data source with a sample company file opened. And check Use the Query Wizard to create/edit queries.)
'CompanyB' as an example:

The first time use MS Excel to access QuickBooks, you will be asked to grant access permission for QODBC. After you grant permission for QODBC, you will be guided by Query Wizard. Choose any table click on next until you reach to Query Wizard.
Select View data or edit query in Microsoft Query & click Finish:
Write query & click OK. In this example, I am writing Profit & Loss report query.
sp_report ProfitAndLossStandard show Amount_Title, Text, Label, Amount parameters DateMacro = 'ThisMonthToDate', SummarizeColumnsBy = 'TotalOnly'

You will get below message box about SQL Query, Click OK.
Report data is available in Microsoft Query:

Click on File & Return Data to Microsoft Excel to save the export report in Excel spreadsheet.

When you finish the query, choose to save it so that the next time you can directly use it. Leaving MS Query, MS Excel will ask you to import the query result into MS Excel:
Report Data is exported in Excel sheet2.

After the export is complete close company file which is opened in QuickBooks.
Now we will disable auto refresh of data from Data-->Connection-->Properties-->Uncheck Enable Background Refresh & Click OK:

We need to disable auto refresh of data for both company file connection (i.e. Query from CompanyA & Query from CompanyB ).
Now we will add button & we will write code for button click event. On button click, it will open connection for CompanyA, refresh report data & close connection for CompanyA, sleep for 15 seconds, open connection for CompanyB, refresh report data & close connection for CompanyB.
You can add button from Developer tab in MS Excel. If the Developer tab is not available, display it.
Display the Developer tab
Click the File tab, click Options, and then click the Customize Ribbon category.
In the Main Tabs list, select the Developer check box, and then click OK.
On the Developer tab, in the Controls group, click Insert, and then under ActiveX Controls, click Command Button.

Command Button is added. I have renamed it to Refresh Data. Double click on the command button to write code.

Write below code to open connection for CompanyA, refresh report data & close connection for CompanyA, sleep for 15 seconds, open connection for CompanyB, refresh report data & close connection for CompanyB.
15 seconds sleep required for closing one company file and switch to another company file.
Private Sub CommandButton1_Click()
ActiveWorkbook.Connections("Query from CompanyA").Refresh
Application.Wait (Now + TimeValue("0:00:15"))
ActiveWorkbook.Connections("Query from CompanyB").Refresh
End Sub

Report Data will be refreshed on clicking Refresh Data button.
